Hello Everyone!
Hope everyone is having a great weekend. I promised on my last post to tell you about something new that I was doing. Well, the best laid plans of mice and men. I got sick. Just today I started working on the birthday gifts. The baby item is going to have to wait as I need one more trip to Joann's before I can finish. So, I say all that to say that I am going to digress to another subject for today. Have any of you other moms out there ever had a time where you are working with your children to help them learn this or that and you're thinking, "Are they ever going to get this?" or just wonder when some of those household responsibilities will be able to be shared more readily with your children? Well, I have to admit that at times when I'm snowed over with lots of household chores I think about my kids helping out more. I have an eleven year old son and a nine year old daughter. They do fairly well with helping out when they are told. Now mind you it may take a few reminders to keep them focused but they still get the job done for the most part. (that is except for my daughter's room; we won't even go there.) Now as I said, I was sick the last few days. Actually, the whole family was sick. My daughter being the first to come down with the fever, sore throat, cough, etc. I thought I would get by without getting sick. I think I forgot to knock on wood when I thought that. I came down with it on Wednesday evening. By Thursday, my daughter went from barely moving off the couch to being a regular Florence Nightingale. She cooked dinner for us, got medicine for her brother, and brought me things when I needed them. (Kleenex, water, etc.) Dinner was a simple affair of green bean casserole and crescent rolls. She did it all by herself and I have to say, I was proud! None of us was very hungry but we wanted something warm in us and her dinner did the trick. She also helped me get a little laundry started. So now I'm starting to see the training paying off. Now if I can just figure out a way for her to want to do this all the time and not just when mommy's sick!
Have a blessed day!
maggie jane
PS. I am hoping to give out my birthday gifts on Sunday. I will post about what I made after that as I don't want to spoil the surprise!
Saturday, February 26, 2011
Wednesday, February 23, 2011
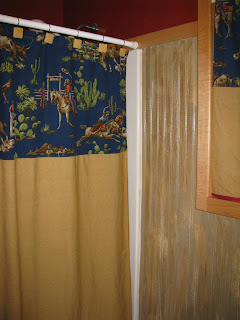
Girl to Boy Bathroom Redo
Hello Everyone!
No, I haven't fallen off the face of the earth. I would like to say it has been busy around here but in a way, things have been a little slow. Maybe that is why I haven't posted anything in a while. I have been working on a couple of things but nothing is ready to show you yet. Soooo, I'm going to pull another out of our last year's remodel folder. This one is of a bathroom that went from a "beachy" feel girl's bath to a "cowboy" boy's bath. I had taken down the decor before I took these pictures but you can tell the color and just let your imagination figure out a "beachy" decor. So here are the before pics:


 Now, I will show you the after pics cowboy style.

 It made a huge change in this bathroom but is more fitting for my son. I would also like to make a rustic sign to go in there. If anybody has any ideas on the saying let me know. I thought of "Howdy, Partner. Come in a sit awhile." but then I realized what room I was making this for and decided that wouldn't quite work. (Ha Ha)
No, I haven't fallen off the face of the earth. I would like to say it has been busy around here but in a way, things have been a little slow. Maybe that is why I haven't posted anything in a while. I have been working on a couple of things but nothing is ready to show you yet. Soooo, I'm going to pull another out of our last year's remodel folder. This one is of a bathroom that went from a "beachy" feel girl's bath to a "cowboy" boy's bath. I had taken down the decor before I took these pictures but you can tell the color and just let your imagination figure out a "beachy" decor. So here are the before pics:


There was much deliberation over the beadboard walls. I started the first coat and my son came in and said that he liked it. I told him it was only the first coat. He still liked it. I wasn't too sure. After looking at it and thinking a while, I decided to sand it down a bit and then add a brown glaze in spots. Now it looks kind of like an old barn. Anyway, I think it turned out pretty good. Let me know what you all think. We also moved him into my daughter's old bedroom so that had to be done as well. I will show those pics on a later posting. That is all for now. I will try to share something new in a day or so. Just to give a little hint, there was a new baby born in the family (not mine) so I had to sew. There are a couple of birthdays coming up next week so I had to make something. Sounds like maybe some material for a later post don't ya think?
So until next time,
Have a blessed day!
maggie jane
Friday, February 18, 2011
Warmer Weather = Grill Time!
Hello Everyone!
Just thought I'd share a quick recipe with you all today. I was wracking my brain yesterday trying to figure out what to have for dinner. It happens that way sometimes. I'm not as organized as some of you out there that put together a menu for like a whole month. I've tried but don't seem to stick with it very well. Anyway, I decided last night that it was a good night to break out the grill. Last week we had subzero weather and over a foot of snow. This week, it is in the 70's. Gotta love the Midwest. I ended up marinating salmon and a couple of pieces of chicken. (Daughter does not like fish. Where did she come from anyway?) The rest of us love fish and it had been a while since we had grilled some. This is not the recipe I want to share but just as a side note, I marinate my fish (& chicken; separately) in Italian dressing & lemon juice. It works great and you don't have to marinate it for very long. The recipe I wanted to share is for a grilled veggie pack. Here are some pics of the process.


Just thought I'd share a quick recipe with you all today. I was wracking my brain yesterday trying to figure out what to have for dinner. It happens that way sometimes. I'm not as organized as some of you out there that put together a menu for like a whole month. I've tried but don't seem to stick with it very well. Anyway, I decided last night that it was a good night to break out the grill. Last week we had subzero weather and over a foot of snow. This week, it is in the 70's. Gotta love the Midwest. I ended up marinating salmon and a couple of pieces of chicken. (Daughter does not like fish. Where did she come from anyway?) The rest of us love fish and it had been a while since we had grilled some. This is not the recipe I want to share but just as a side note, I marinate my fish (& chicken; separately) in Italian dressing & lemon juice. It works great and you don't have to marinate it for very long. The recipe I wanted to share is for a grilled veggie pack. Here are some pics of the process.

First I start with two pieces of tinfoil that are pretty long. I sprinkle a little olive oil on the bottom and then add my asparagus (washed and trimmed).

Next I add mushrooms that have been washed and trimmed as well.

Then I add peppers (orange & red but any kind will work), onions, a little more olive oil, juice from half a lemon, garlic salt, pepper and basil. The spices are really up to you. Be creative and add what you like.

Then fold all the sides up so it is sealed all the way around. Place on grill and let them cook. I still can smell all those flavors just melding in the foil. Yum!

This is what they looked like when we opened the foil. Beautiful! Look at all the colors and textures. The cooking time is really something that I can't tell you. I would say at least 10-15 minutes. These were tender but still had a little bit of a bite; not soggy. They were just like we like them. I wish now I would have timed them to know because these came off at just the right time. I heard a lot of, "Mmm, boy these are good." and, "Baby, these are wonderful." and other such exclamations of culinary delight from my hubby. Always makes a wife feel good to know her husband is really enjoying her cooking. Even better is when the kids are enjoying their veggies! I heard several "Yum" 's from the kids as well.
So next time you get in the "grilling" mood, give these veggie packets a try. The veggies can be varied to your preference as well. To us, the asparagus is a must and the other stuff sometimes changes. Enjoy!
Have a blessed day,
maggie jane
Thursday, February 17, 2011
Little Living Room Project
Hello Everyone!
I am going to include another of my projects from last year that I haven't posted publically. If you go back here, this is explained.

This picture is of my wall in the living room that leads up stairs. It is a white wall with a large framed picture of our family. The table is there because it doesn't have any other home at the moment. It used to be in my sewing room with my machine on it. However, it is going to be spending some time in the living room until the other rooms are done and I find the perfect place for it. I don't know if you can see in this picture but the drawer is missing. It is still upstairs holding some of my sewing stuff. Hopefully soon they (desk & drawer) will be able to get back together. I have never really liked this wall. The picture was hung too high. The reason for this is because I didn't want to make any new holes in the walls. These holes were from a previous picture that actually hung a little lower. I think it has to do with the placement of the brackets on the back of the frame itself. Anyway, this wall just didn't look appealing to me. It looked unfinished. I didn't really care for the Lego bucket underneath either. (smile)
Soooo, I decided to do something about it. The Legos got put in a closet upstairs, the picture got lowered, the table got decorated and the wall got a new addition. This is what it looks like now.

My guest book now is readily accessible. I elevated it by standing it up on a easel. For those of you who visit and are a little cold natured, I have several toss blankets in a basket underneath this table.

I took an idea from a friend of mine and put a collection of loose pictures in a basket. It is kind of fun to just pick up a few and rumage around and see what's in there. There is no rhyme or reason to the collection. Some are current and some are older. Anyway, I placed them on top of some home decor books & magazines.

This is the sign I made to help tie in the picture with the other things and brake up all the white on this wall. It says "est. 1998". This is our wedding year. There is a ceramic bird sitting on one corner and and old rusty piece of an old school bus toy that we found in our yard sitting on the other corner. By the way, I have to give credit for this idea to Jillian over at The Virginia House where she made a similar sign. Her's was actually the shelf and then she had her "est." sign on a separate board sitting on the shelf. I just combined the two ideas into one. Thanks, Jillian, for the inspiration!

This added accent is a cheap inexpensive vase from the Dollar Tree. Then I took 3 packages of ping pong balls and painted them all white to cover the label. Then I used my Cricut machine and cut some small S's out of black sticky vinyl. I put two S's per ball. I was inspired by this idea from another blog called The Gingham Goat. I think monograming adds a nice personal touch. Of course, you aren't decorating if you don't add a candle or two. Here I added a green candle to add a splash of color and to match my bird that is on the shelf. Overall, I am pretty pleased with the way it turned out. Now I don't feel like our family picture is just floating up there in never never land.
As I said, this was last year's project. As I always like to do a little revising from time to time, I have changed it a little tiny bit this year. My drawer found it's way back to the desk and I added a few different types of balls to the vase. I thought it needed a little more texture and varying color. This is what it looks like now.


Have a blessed day!
maggie jane
Long Suffering Husbands
Hello Everyone!
I encountered a funny thing yesterday. Actually, I encounter this just about every Wednesday that is why it's funny. A little background here. I go to town every Wednesday for piano lessons for my daughter and shopping. "Go to town" you say. What's that? For all you city folk, that is what us country folk say when we are going shopping. I've had to learn this "term" as I was raised in the city. Anyway, to my story. I make it a habit to go to JoAnn's (is this good or bad?) just about every Wednesday. A lot of times, my teenage niece goes with us so we "make a day of it". We also hit other favorites like Target and Hobby Lobby (gotta love those stores). We discovered that every time we go to JoAnn's there is at least onehusband man sitting in his car in the parking lot. I am making assumptions here but I believe these are long suffering husbands waiting on there wives to shop the fabric store. I call them long suffering because most of you all know how easy it is to spend a lot of time in a fabric store. As our minds roll with ideas and we compare one fabric to another. Or, we stand there and say, "Should I get one yard or five?" or "It is such a good deal. Surely I can find something to make with it." and so forth. You all have been there and done that right? I hope so because I don't want to be alone in my fabric shopping quandaries. I say all that to say that it has happened so often now that when we pull into the parking lot, we look around for those long suffering husbands and just laugh. So, next time you hit a JoAnn's, look around. You just might see them too. Some of you may not have to look farther than the seat next to you as you exit your car. Heh, Heh. To all you long suffering husbands out there, THANKS!
I encountered a funny thing yesterday. Actually, I encounter this just about every Wednesday that is why it's funny. A little background here. I go to town every Wednesday for piano lessons for my daughter and shopping. "Go to town" you say. What's that? For all you city folk, that is what us country folk say when we are going shopping. I've had to learn this "term" as I was raised in the city. Anyway, to my story. I make it a habit to go to JoAnn's (is this good or bad?) just about every Wednesday. A lot of times, my teenage niece goes with us so we "make a day of it". We also hit other favorites like Target and Hobby Lobby (gotta love those stores). We discovered that every time we go to JoAnn's there is at least one
Tuesday, February 15, 2011
Do You Love Homemade Flour Tortillas?
Hello everyone!
The questions is this, "Do you love homemade flour tortillas?" Well, I know I do. If you have ever wanted to make some but didn't know how than read on and I will share the recipe with you. I have to add a little disclaimer here. Icheat use an electric tortilla press that not only presses but also cooks the tortilla for you. If you have one than GREAT, read on. If you don't well, go out and buy one, read on anyway and I'll tell you how to make one without a press. Ever since I started making my own tortillas, I have had a really hard time buying the ones in the store. In fact, I think I have only done this a couple of times in the last few years. They just don't taste the same. Once you start making them, you will be hooked as well. So here goes the recipe:
FLOUR TORTILLAS (makes about 10-12 tortillas depending on the size you make)
2 cups flour (you can also use whole wheat but I would suggest going half white & half whole wheat)
1/2 tsp. baking powder
1/2 tsp. salt
3 to 3 1/2 Tbsp. oil
2/3 to 3/4 cup hot water
I use a food processor and it makes the dough in nothing flat. First put the flour, baking powder and salt in the processor and pulse it a couple of times to blend. Then add the oil and do the same. Next add water. I usually pulse as I'm adding the water. You will see it all pull away from the sides and start to form a ball of dough. This is what you want. When you see it turn to a ball, you are done. The next thing you want to do is get out a cookie sheet and add a thin dusting of flour. Roll out your dough into individual balls approximately a little bigger than the size of a golf ball. Place on floured tray, cover with a towel and let rest for 20-30 minutes. You can let them sit up to an hour but they tend to work better if you at least let then rest for the 20-30 minutes.


Now for you none press owning people out there. It doesn't take that much longer for you. You will do everything the same up until the point where you would put them on the press. At this point you will need a floured surface so you can roll them out by hand with a rolling pin. Then you just cook them on a flat skillet or griddle. It just takes a little more muscle and they don't always turn out good and round but they still taste just as yummy.
The picture above of the plate of tortillas is actually 2 batches. I will give you a hint here. Don't double the recipe. I have tried this and for some reason they just don't turn out the same. Since it is so fast to do the dough in the food processor, I just do it twice (or three or four :) ). I made these today and then made these for the kids and my lunch.

This recipe always turns out great. I have had many requests for it from family and friends. I hope you will give it a try and let me know what you think. If you have any questions, just let me know and I will get back with you.
Have a blessed day,
maggie jane
The questions is this, "Do you love homemade flour tortillas?" Well, I know I do. If you have ever wanted to make some but didn't know how than read on and I will share the recipe with you. I have to add a little disclaimer here. I
FLOUR TORTILLAS (makes about 10-12 tortillas depending on the size you make)
2 cups flour (you can also use whole wheat but I would suggest going half white & half whole wheat)
1/2 tsp. baking powder
1/2 tsp. salt
3 to 3 1/2 Tbsp. oil
2/3 to 3/4 cup hot water
I use a food processor and it makes the dough in nothing flat. First put the flour, baking powder and salt in the processor and pulse it a couple of times to blend. Then add the oil and do the same. Next add water. I usually pulse as I'm adding the water. You will see it all pull away from the sides and start to form a ball of dough. This is what you want. When you see it turn to a ball, you are done. The next thing you want to do is get out a cookie sheet and add a thin dusting of flour. Roll out your dough into individual balls approximately a little bigger than the size of a golf ball. Place on floured tray, cover with a towel and let rest for 20-30 minutes. You can let them sit up to an hour but they tend to work better if you at least let then rest for the 20-30 minutes.

While they are resting, preheat your tortilla press. Make sure your press is good and hot before you start or they will stick. It only takes about 30-40 seconds per side to cook these. So if you use the processor and let them rest for the shorter time, you can have fresh, warm, homemade tortillas within an hour. YUM!

While on the press.

Plate full of yummy tortillas!

I just love to sneak one while they're hot. I add butter and salt and roll it up! Mmmm, good!
(This picture courtsey of my 9 year old daughter)
(This picture courtsey of my 9 year old daughter)
Now for you none press owning people out there. It doesn't take that much longer for you. You will do everything the same up until the point where you would put them on the press. At this point you will need a floured surface so you can roll them out by hand with a rolling pin. Then you just cook them on a flat skillet or griddle. It just takes a little more muscle and they don't always turn out good and round but they still taste just as yummy.
The picture above of the plate of tortillas is actually 2 batches. I will give you a hint here. Don't double the recipe. I have tried this and for some reason they just don't turn out the same. Since it is so fast to do the dough in the food processor, I just do it twice (or three or four :) ). I made these today and then made these for the kids and my lunch.

Quesadillas with beans & cheese
This recipe always turns out great. I have had many requests for it from family and friends. I hope you will give it a try and let me know what you think. If you have any questions, just let me know and I will get back with you.
Have a blessed day,
maggie jane
Sunday, February 13, 2011
Signs for a Baby Room
Hello Everyone!
Hope everyone has had a wonderful weekend. We had a busy one. Saturday, some friends and I put on a baby shower brunch for another friend. I thought I'd share a few pics from that but what I really wanted to share was my last minute, night before, add a little extra to the gift, project. I happen to be looking around blogland when I saw a picture of a baby room that had a really cute saying on the wall. Since I was getting ready for this shower, I thought, "Oh, that would be cute to add to my gift." Well, I had this thought at like 10pm so I did a very quick variation on the theme. The one I saw was big. I didn't have that size frame and I didn't think my friend would want such a large picture on her babyroom wall. So, I took the idea and adapted it to what I thought she would like. I actually expanded it a little and did three little frames with three different sayings. This is what I came up with:
 I forgot to take pics as I was doing them so this isn't the best, most close-up picture but I think you can get the general idea. The frames were a set from Target that I got quite a while ago and just stored for a "rainy day". They were black so I
 threw put a little white paint on them and then distressed them a bit. Then I went to the computer and printed my sayings, in purple, on cardstock. I trimed them out with purple cardstock. It doesn't show very much of the purple but that is ok. I just needed a hint of the color. Purple is what she is accenting with in her babyroom. I wasn't sure the exact shade so I didn't want to "overdo" the purple and then have it clash. Anyway, I was pretty pleased with how they turned out; especially as a last minute add-in to my original gift. Now I will share a couple of pics from the table set up we did. It was a fancy finger food lunch that everyone contributed to and then cheesecake for dessert. If I haven't shared this yet, I will confess now that cheesecake is my absolute favorite dessert. I thoroughly enjoyed myself yesterday by having two pieces. I still am shocked at myself but I only feel a little bit guilty because it was oh so good! Enough of that, here's the pics.


 The food was yummy, the dessert even better, the fellowship a blessing, the giving special and a good time was had by all!
Have a blessed day!
maggie jane
Hope everyone has had a wonderful weekend. We had a busy one. Saturday, some friends and I put on a baby shower brunch for another friend. I thought I'd share a few pics from that but what I really wanted to share was my last minute, night before, add a little extra to the gift, project. I happen to be looking around blogland when I saw a picture of a baby room that had a really cute saying on the wall. Since I was getting ready for this shower, I thought, "Oh, that would be cute to add to my gift." Well, I had this thought at like 10pm so I did a very quick variation on the theme. The one I saw was big. I didn't have that size frame and I didn't think my friend would want such a large picture on her babyroom wall. So, I took the idea and adapted it to what I thought she would like. I actually expanded it a little and did three little frames with three different sayings. This is what I came up with:


Have a blessed day!
maggie jane
Thursday, February 10, 2011
Repurpose, Redo, Repaint, Re, Re, Re...
Hello Everyone,
Here is one of those projects that I did last year in the midst of all the remodeling I told you about.
This little project is a bedside table for my daughter. I purchased this little gem in 1993 when I moved to Texas. I lived with my aunt and uncle when I first moved there. Their neighbor across the street was having a yard sale. It was already an antique when I got it. Anyway, this is the third time it has been "redone". It's one of those pieces of furniture that keeps giving and giving. Gotta love those kind!

I almost forgot to take my "before" picture. I had already taken the hardware off when I remembered my camera. Anyway, this was what it looked like when it was in my son's room. Now, the next picture is what it looks like in my daughter's "new" room. I'm kind of a sucker for monograms and lettering so I decided to add the yellow "A" in the center to match the yellow on the wall. I also scored the yellow ceramic knob at my favorite store, Hobby Lobby. I'm pretty happy with how it turned out.

I will try and intersperse my old projects that friends and family have already heard about on my private blog with new projects. Don't want the fam to get bored. (Heh, Heh) So until next time....
Have a blessed day,
maggie jane
Tuesday, February 8, 2011
Fire Starter Tutorial
It is that time of year to cozy up to the fireplace or wood stove. I have had a couple people ask about the best way to get a fire started. This was coming from some who were new to having a fireplace. When I mentioned my method, I was encouraged to do a tutorial. Many of you already know how to make fire starters so you can just ignore this one. But for you newbies, here it is. This is the best way that I have found and it is easy and cheap. If you have cardboard egg cartons, dryer lint and some wax, you have the makings for fire starters.

Start by lining a cookie sheet with foil. This will catch the excess melted wax. Then line the egg carton with dryer lint. Just pull it apart into little balls of lint. I also put it in the lid.

Then, you melt some wax in an old frying pan. You can use parafin wax or old candles that don't have a whole lot of wick left. This is what I do.


Just spoon a little over each little egg portion and the lid. Then let it cool.

When they have cooled, just cut apart with a razor knife. You now have a bunch of fire starters. I usually use one or two with a little kindling and a little newspaper and my fire starts right up. The whole concept to the wax and lint is that it will burn longer than just paper allowing your wood to catch. Since I started using these, I have never had an issue with getting a fire going. On cold mornings like we are having now, that is a must. So for you that are struggling with getting your fires started, give this a try and I bet you won't have anymore trouble.
Recipes, Friends & Sharing
Greetings everyone!
I am going to start off my posting excursion with a story and a recipe. The story goes like this:
Several years ago, I had some friends over for dinner. When the evening ended, I sent a few leftovers home with my friends. A few days later, she brought my container back to me. You're probably thinking "So, what's so special about that?" Well, I'll tell you. The thing that was so special was that my container was filled with homemade, yummy muffins. It may seem simple but that small gesture meant a lot to me. It has come to mind several times. In fact, I remember it every time I make these muffins; which is pretty often. It was a gesture in thankfulness (for the leftovers), sharing (something that she'd made), and love (for me as a friend). Not only did she share the muffins but the recipe as well because believe me, I called her up right away and asked for it! That was probably 15 years ago. I bet that she really didn't think a whole lot about the effect she had on me or continues to have on me because of that small gesture. So if you read this Lorrie G., a big "Thank You" for your small act of kindness that has turned into many years of enjoyment. Isn't that what friends and recipes are for, sharing? Now, as I have said all that, I am going to share the same recipe with you my new friends (and some old ones as well).
Zucchini Chocolate Chip Muffins
2 cups sugar
1 cup oil
3 eggs
2 cups shredded zucchini
1/2 tsp. vanilla
1/2 tsp. salt
1/2 tsp. nutmeg
1/2 tsp. cinnamon
2 tsp. baking soda
3 1/2 cups flour
1/2 cup chocolate chips (I use mini chocolate chips)
Mix first 5 ingredients in a mixer. In a separate bowl mix dry ingredients and then add gradually to the rest already in the mixer. Stir in chocolate chips. Bake in a 350 degree oven for 20 to 25 minutes. This recipe yields 24 muffins. It can also be placed in loaf pans to make bread. Don't forget to grease your pans or use paper muffin liners.

So here is my first recipe to share with you all. Hope you give it a try and enjoy them as much as we do. Give me a shout back and let me know what you thought of them.
Until next time,
maggie jane
From the beginning...
Welcome to my all new blog. I was introduced to the blogging world in July 2010. I started a private one then and still have that one going. However, I decided to go ahead and open up a blog for everyone to enjoy. (At least I hope you will!) We did a lot of projects last year. We started with a "forced" remodel (water damage) and from there it just kind of grew. I did many smaller "decor" type projects to go along with the "new" rooms. I will try over time to share those with you all. Those of my friends and family who have already seen these posts will have to just bare with me. I promise I will be adding more new items; be it things I've made, redone, or new recipes, or just plain random thoughts about this or that. As I have stated in my profile, my name isn't Jane but the title fits me to a tee. I like to have my hands doing all kinds of different things. I like to learn so many different things that I don't have time to "master" any of them. It doesn't help that my life is very busy without the projects. I am a wife and mother and I homeschool my two offspring. Time is limited but I try to fit in what I can. Now I confess that sometimes my projects get ahead of the laundry and ironing pile (least favorite chore) but I am going to try to be more careful to not let my pile get too mountainous. At least that is the goal. Some of the things that I enjoy doing are sewing (have recently gotten hooked on quilting, thanks to my sister), making signs and other home decor accents, jewelry making, remodeling/redecorating, cooking and entertaining. I really like to check out other blogs for ideas on re purposing or other DIY projects. Saving money is always a good thing.
That was a little about what I like to do. Now, here is a little about who I am. I was born and raised in So. California, the youngest of 6 children. We grew up surrounded by music. My grandfather started a music store back in 1924 and passed it down to two of his 5 sons; my father being one of those. We had every opportunity to learn any instrument we wanted. So did we all go on to perform great concerts at Carnegie Hall? No, sadly we only learned a little about playing instruments. I play the piano some but it's another of those things I never mastered. My daughter is now taking lessons and I'm hoping through osmosis, I will learn a little more. Unfortunately, I think it is going to take practice; another one of those time takers. After high school, I went to college and received my certificate in Floral Design. I worked in that industry for several years. When I was 23, I moved to Texas with my aunt and uncle. I worked both in floral design and started my own business hanging wallpaper. I also spent time as a secretary. (Seems like the Jane of all Trades has been going on for awhile now. ) During this time, I moved out on my own with a friend. That friend just happened to have a brother and well, you probably get the idea. That brother later became my husband. The problem was that he lived in Missouri. So, that was another move for me. Now, almost 13 years later, we are still happily married and raising our two children. I haven't worked outside the home since we've been married. Being married and having kids is work, right? Sometimes I call myself a Domestic Engineer just to give it a fancier title. There have been different trials through the years but my Lord has definitely helped me through and blessed me much more than I deserve. Which brings me to another thing I would like to not necessarily "master" but grow in and that is my Christian walk. I still have a lot to learn and grow in and hope that I do grow a little bit each day. So there is a little about me. Check back in to see what I have been creating, redoing, cooking, etc.
Hope you all have a blessed day!
maggie jane
Subscribe to:
Posts (Atom)